From Mocap To Movie
Course # 28, SIGGRAPH 2005 Los Angeles, CA, USA

Important Note: I am part way through reformatting these course notes from the original and the below is a work-in-progress with errors. In the meantime, please feel free to download the full course notes in PDF format (5mb PDF) for the original layout and design.
Presented By:
Rob Bredow
Albert Hastings
David Schaub
Daniel Kramer
Rob Engle
Sony Pictures Imageworks, Culver City, CA, USA
Written by Rob Bredow, Demian Gordan, Albert Hastings, David Schaub, Daniel Kramer, Rob Engle, Ken Ralston, Jerome Chen,
Edited by Patricia Rosales
Based on interviews conducted by Debra Kaufman
Special Thanks to Don Levy, Sande Scoredos, and Carlye Archibeque for their help and support of these course notes.
{{% toc %}}
Introduction

1.1 The Polar Express

Chris Van Allsburg’s classic children’s book The Polar Express, has been a part of holiday celebrations for families around the world for nearly 20 years. The story of a boy who begins to doubt the reality of Santa Claus and takes a magical trip to the North Pole to learn once again to believe, is told with 15 striking and sensitively rendered oil-pastel illustrations. Director Robert Zemeckis’ goal was to communicate the story through the beauty and richness of Van Allsburgh’s illustrations “as if it were a moving oil painting, with all the warmth, immediacy, and subtleties of a human performance.” With visual effects supervisors Ken Ralston and Jerome Chen at the helm, Imageworks created a series of new patent-pending tools to give filmmaker Robert Zemeckis the ability to tell his story in a new and unique way. These combined techniques were later dubbed “Imagemotion”.
The Polar Express is the first feature film to be shot entirely on a motion capture stage with these unique set of tools. The system provided Zemeckis with unparalleled versatility in his storytelling choices. It was designed not only to capture every discernable movement and subtlety of human expression but it also offered full, limitless coverage with natural camera movements, opening the whole range of depths and perspectives.
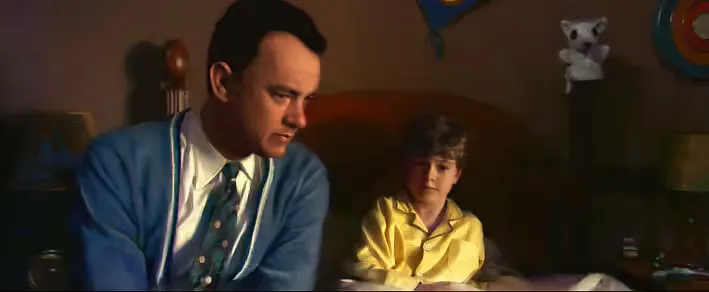
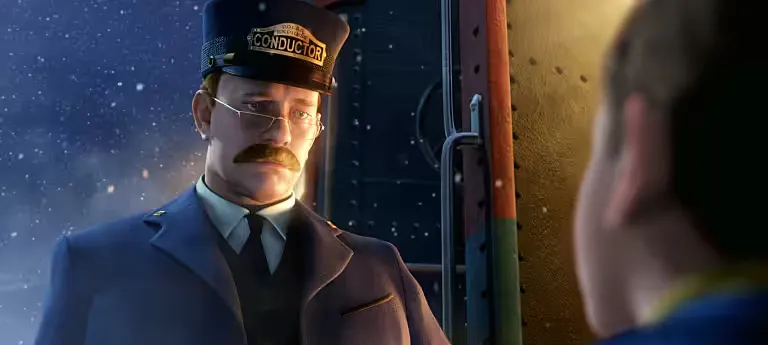
 Tom Hanks as Santa, The Conductor and The Boy in a single shot. Each set on stage was built at two scales to allow Hanks to play the different sized characters.
1.2 About These Notes
These course notes cover new tools, processes and pipelines that were developed to make The Polar Express a reality. These course notes are intended to serve as a reference for some of the more unique aspects of The Polar Express production pipeline. Many aspects of the production of the film which share a lot in common with other CG feature films have been intentionally omitted.
 Conceptual Artwork of Tom Hanks as the Conductor.
The Polar Express Tests
2.1 Three Options
Ken Ralston and Jerome Chen assembled an Imageworks team to brainstorm on how to bring the Van Allsburg’s paintings to life. Three possibilities emerged.
The first idea was to shoot the movie as live action and then use post processing techniques to give it the appropriate storybook feel. A stage was built of the boy’s bedroom and Tom Hanks was shot interacting with the young actor in exactly the same manner a normal live action film would be shot. Then that footage was painted on 12 key frames in the style of the book. Optical flow techniques were used to track the stylized paintings to the original footage. Only 12 key paintings were done and the computer interpolated between the rest. This test clearly accomplished the goal of matching the book and would allow Zemeckis to shoot the film as a liveaction movie. This method made sense and looked good. Second, an actor was shot against a blue screen, the necessary post processes were added to give the actor a storybook feel, and all the environments and props were to be added digitally. The idea was to utilize between 50 and 100 percent of the actor, perhaps even adding digital beards, costumes and so on.
To accomplish this test a real-time previsualization system was created to track the live-action camera and generate a virtual set in real-time on stage for use by the director. During the development of this process, it became obvious that it was too difficult to figure out the lighting, camera angles, makeup and costumes without knowing what portion of the shoot was going to be used. It was ultimately decided that this method presented too many restrictions and not enough of an upside.
Option number two was abandoned after shooting without taking the test through to completion.
The third idea was to use motion capture to get the real, distinctive performances of Tom Hanks and the other actors and use them to drive purely digital imagery. An initial mocap test with Tom Hanks was performed. Hanks walked around on a black stage wearing small optical markers. Infrared cameras covered the stages space, or “volume,” from all directions. While the idea of doing the movie entirely with motion capture was being investigated, the idea of Tom Hanks playing more than just the role of the dad was also being explored. Zemeckis definitely wanted Tom to play more than one role, so this would give him the creative flexibility he needed. In this way, any actor could be cast in any of these roles, their motions taken and fit to virtual actors. The test was completed by capturing a two minute sequence on stage and taking the sequence all the way through to completion digitally. The test served as a proof of concept for this new methodology and gave the studio a piece by which they could understand what kind of movie Zemeckis was interested in creating.
2.2 Filmmakers Feedback
The results of the first and third tests were shown to Zemeckis. He and Hanks agreed that directing and acting using the third, all motion-capture method was liberating. Zemeckis pointed out that the experience was more akin to directing a play than a movie because they could shoot much longer takes. They didn’t have to stop whenever the camera needed to be moved or a boom mike floated into frame.
Zemeckis could blend portions of different takes so, for example, if he liked the beginning of Take 2 and the end of Take 5, he could blend them together. These factors enabled Zemeckis, Hanks and other creatives to focus completely on the acting.
As production proceeded, shooting with the motion capture method proved to be much quicker that shooting a traditional live action film. A live action version of The Polar Express with all its locations could have taken eight months to shoot.
Zemeckis, with the Imageworks mocap set up, was able to accomplish the entire shoot in 44 days. Once the decision was made to shoot the entire movie on the motion capture stage it became imperative to capture both the body and face of the actor simultaneously. The test demonstrated that it would be too time consuming and did not facilitate a natural performance to require an actor to “act” the face part of the performance in one setup and then separately act the “body” part of the performance . Separate captures would have also required additional re-timing and reanimating in “post” which would be very time consuming.
At the beginning of The Polar Express , there was no system available to accomplish the goal of capturing both facial and body animation in a 360-degree volume.
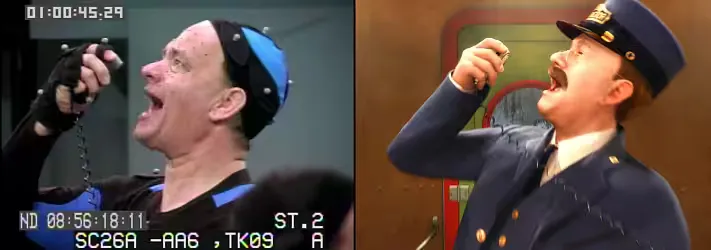
Working with Vicon cameras, a 64-camera system was designed that would be able to achieve what was needed: 8 cameras that would provide the body data and 56 that would provide facial animation data in the same volume. Once the system was put together and the initial tests were performed, the actors found they could perform with very few limitations. At first only two actors were captured at once. By the end, the number of cameras covering the body had doubled (to 16) and 4 actors were captured simultaneously—both body and facial data.
 Painting “outside the lines”. Later, Zemeckis decided emulating the paintings too closely actually flattened the movie too much so this concept was abandoned.
On Stage
3.1 The Mocap Stages

Three separate shooting stages were created. The area that the cameras could see was called “the volume” (see Mocabulary). The first stage contained a volume that was 30ft by 30ft by 16ft high and used solely for body capture.
The second stage, which held the largest volume, at 30ft by 60ft by 16ft high, was also used solely for body capture.
This stage was specifically designed for the hot chocolate scene, which needed to be big enough to cover the 10 dancers. The smallest stage, dubbed “the close up stage,”, held a volume that measured 10ft by 10ft by 10ft high and was where most of the movie was shot. This was where the body, hand, and facial animation of multiple
3.2 The Cameras
Occlusion was not a significant problem, but it is always something that has to be dealt with when it comes to optical motion capture.
The more cameras used, the less likely there were to be problems with occlusion. The cameras were placed around the volume at three different levels, and a different number of cameras were used throughout the production. At the highest point, 74 cameras were installed for the smallest volume, 120 cameras for the biggest volume, and 48 cameras for the medium-sized volume, for a total of 242 cameras.
One of the challenges on the close up volume was that the cameras couldn’t see anyone’s face below 3 feet.
When the actors did anything low to the ground it was shot once normally, and then they were raised up on a platform, which was adjustable from 1 to 3 feet in height, and the low part was shot as a separate pass. For example, in the scene where the kids pull the emergency brake on the train and then tumble to the ground in the ensuing sudden stop, the action of them hitting the ground was picked up separately from the rest of the action, and then blended later with the action above three feet.
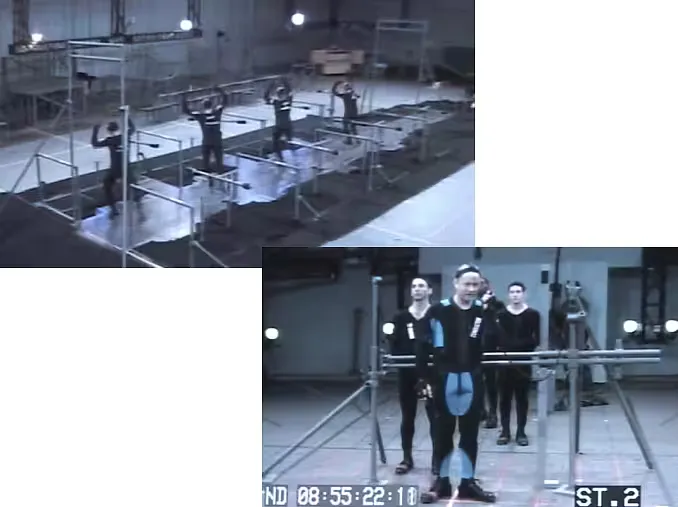
 3-d visualization of the camera positions as configured on the “close-up” stage.
3.3 Scale And Mocap
There were actually no child actors in The Polar Express , only child stand-ins whose motion was later replaced by adults performing as children. The illusion of children was created by scaling sets and props to make adults appear to be children in relationship to their environments. Half the train car, for example, scaled up to adult size, almost fit within the volume of the largest mocap stage. When the production shot over-scale, the train car was shot in segments in the largest volume. In fact, much of what was shot in the largest volume was recorded mainly for wide shots and then re-shot in the smallest 10x10x10 volume where facial, hand, and body information was captured simultaneously. For example, if there was a 60-foot long scene, it was shot in the large volume once and then in the small volume in six 10-foot segments. Nearly the entire movie was shot twice in this way.
There were three scale versions for every set. The normal sized set was adult scale. Sets with children were 120 percent scale size. The elf scale version, because elves were only 2 feet tall, was 200 percent scale size. For the child- and elfscaled scenes, oversized props were used. On the big stage, both the adult and child-scale sets were set up at one time, for the same scene. Child stand-ins acted on one side and adults playing kids acted on the other, which helped to keep everyone “in the moment.” To keep eye lines correct, a rig called a “snorkel” was devised. A snorkel was essentially a backpack with a three-foot rod with a ball on top of it.
Whenever Tom was playing a child and had to interact with an adult, the adult was equipped with the snorkel.
The set department brought in large luan plywood sheets and taped top-down views of the floor plans on the ground of the stage. Every set to be shot that day would be pre-taped on luan and then stacked in shooting order. The luan was a reference guide on where to place things in the volume. It was a quick and efficient way to know where things were in the virtual world.
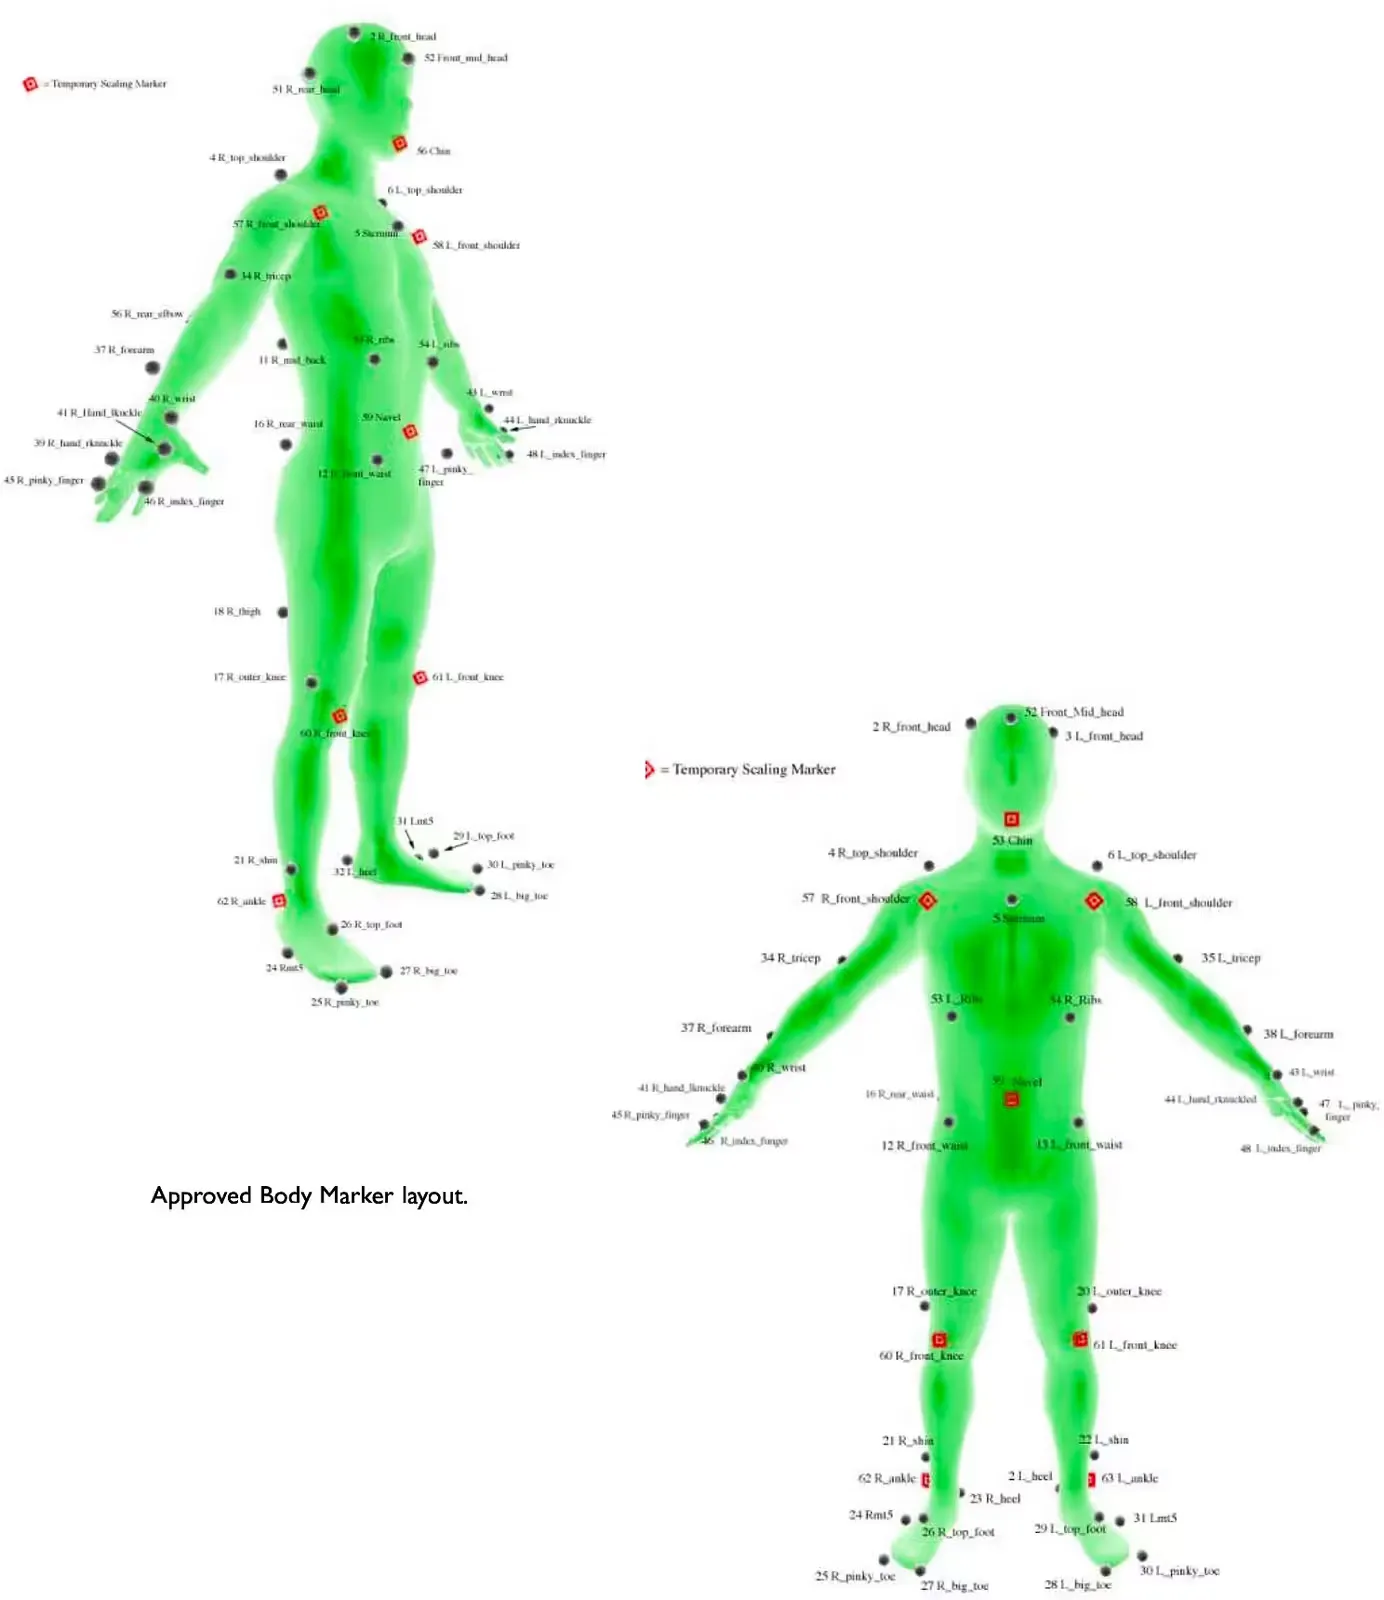
3.4 Mocap Markers
During regular capture, each body had 54 markers, which were each 9 millimeters in diameter. A full make-up department would apply the markers for up to 10 actors at a time.
Typically, facial mocap is done with the actor seated on a chair and the cameras two or three feet from the actors’ head, with markers usually 3 to 5 millimeters wide. On The Polar Express, facial markers were 2.4 millimeters in diameter and the actors’ facial expressions were captured simultaneously with their body data. Most facial capture systems have 30 to 60 markers.
In contrast, the Imageworks system had 151 markers for the face, which included one on the tip of the nose that was named Eric. Eric was everyone’s favorite marker (so named for a famous Monty Python sketch). Cameras were also positioned 16 to 26 feet away from the actor, dramatically farther than traditional facial capture. This allowed the cast and crew full freedom of movement on set.
After every take, the actors might lose a marker or two. Make-up replaced the facial markers on stage, while wardrobe readjusted the body suits and replaced body markers. This made on-stage performances even more like a live-action set.
 After each day of shooting, lost markers could be found throughout the parking lots surrounding the stages.
3.5 Custom-Made Mocap Suits
 In addition to shooting all of the motion capture scenes, each
actor donned the actual costumes and submitted to laser
scanning and numerous photographs for each layer.
In addition to shooting all of the motion capture scenes, each
actor donned the actual costumes and submitted to laser
scanning and numerous photographs for each layer.
The mocap suits were custom-tailored for each actor. The suits were also color-coded so the actors could easily be identified on the reference video.
The entire suit was made of a special Velcro imported from Japan. They were relatively breathable but did get hot inside. The mocap suits also had name tags to identify the character.
Because Tom Hanks, whose suits were hero blue, played five different characters, different name tags and shoes were used to tell each character apart. As the hobo, Hanks wore an old pair of leather boots. For Santa, he wore black motorcycle boots. Velcro was attached to whichever shoes he was wearing to secure the markers.
A mesh-like material that the cameras could see through was developed to simulate the costumes.
This material was sewn into costumes so the actors could wear them if it helped them get into character. There was a see-through conductor’s hat, jacket and pants for Tom, but he was so good at mime that he preferred not to wear the costume so it was used only a couple of times.
For the digital costumes, there was a full wardrobe/costume department. Every costume in the film was created by the wardrobe department and worn by the actor for a scanning and photographing session.
The close up stage had a capture limit initially of two people at a time. For any scene with more than two people interacting, the shot had to be done in several passes, with no more than two actors in each pass.
This was accomplished by shooting the scene with all four actors in the shot, but without marking the actors who were not being recorded at that time. To hide the actors who had to be in the shot but not appear on camera, a burkha, which is a dark black robe, was designed. This head to foot cloak covered the actor with a long draped veil in front of the face made from a material that allowed the actor to see out, but the camera couldn’t see through it. In a three-person scene, one person would wear the burkha, two people would act normally and then the scene would be reshot with a different actor wearing the burkha. Later the maximum limit was increased to up to four people at once.
 Facial hair and costume reference for Tom Hanks as conductor.
In addition to shooting all of the motion capture scenes, each actor donned the actual costumes and submitted to laser scanning and numerous photographs for each layer.
3.6 Props
A full prop department, including a machine shop, fabricated sets and props. Everything was made out of a fine mesh grid and painted battleship gray, a nice neutral color to cut down on the specular return of the on-set lighting from the surfaces of the sets and props and reduce any possible lighting interference with the motion capture system. The mesh was used to allow the cameras to see through the props. That way, complex sets and props could be built and the camera would shoot right through them. With occlusion always a potential problem, everything introduced into the volume was designed to have the smallest footprint possible.
All the props, anything the characters picked up or interacted with, were markered and captured on the set. That data ended up being good reference for the animators.
3.7 Face/Body Capture
Most of the motion capture that ended up in the film came from the close up 10-foot volume where body and face were captured simultaneously, thereby avoiding the challenges of synchronization.
The reason behind this is that the human face has an immense number of very nuanced dynamics that are intimately linked with the motion of the body. Anything from a head turn to footsteps, from walking to running, are all extremely difficult to line up if the face and body aren’t captured together. In the longer scenes, the combination face-body capture had to be broken down into 10foot segments. For a 60-foot scene, six 10-foot segments would be shot that had to be blended together to create the final shot.

3.8 Processing The Mocap Data
In order to maintain the intimacy between the director and actors, a “mission control center” was built off-stage where the equipment operators, about 20 people for all 3 stages, were stationed.
The Motion Capture Supervisor on set would be in touch with mission control via radio.
In a typical mocap situation, the files would not be distributed across multiple systems, but the amount of data collected everyday was enormous for The Polar Express. On average, 50 GBs a day were shot. Files could be up to 2 GBs each. A system was created with four controlling computers linked together as slaves to a master. Because the memory limit on the slave PCs (2 Gigabytes) was reached, it was decided to shoot at 60 fps rather than 120 (doubling the maximum capture time before running out of RAM). Data went to each of the four slaves and then to the master, where users could retrieve it. There was a 2.5-minute time limit for shooting two people and 2-minute limit for four people for face and body capture simultaneously.
The face and body volume was quite robust. The plan was to capture a 360-degree “cylinder” around each performer, from 4 feet to 7 feet. In actuality, from 3 feet to 10 feet was captured, gining 4 more feet of volume. The resistance to occlusion was also quite good. An actor could whisper in another actor’s ear and not lose any face data to occlusion.
 Panoramic View of Mission Control
3.9 Video Reference
It was important to shoot video reference, especially close-ups of facial performance to get the nuances in the eyes that facial capture couldn’t and to make sure that the keyframe animators had something good to refer to. It also ensured that the end result was exactly as the director thought it would be as he shot it. The video reference was a kind of Holy Grail to get back to what was shot.
Using video cameras was also a back-up plan in case mocap had to be abandoned and replaced with kyframe animation. The Cinematographer headed up a crew of 12 video camera operators to cover the entire volume, including three roaming cameras trained on the actors’ faces at all times. There were typically many takes of each scene, which enabled the performance animation team to request a different angle or a tighter face shot. By the time the director was happy with the performances, the reference video had been refined.
Several teams of technicians gathered and logged the media, including audio files, video reference and body and face tracking data, all of which included a master timecode clock signal which ran continuously during each day of shooting. Stages 3 and 4 (the medium-sized and largest volumes) were designed to allow full freedom of movement for all the video camera operators (and, for that matter, for cast and crew). The smallest volume was designed with “sweet spots” where the cameramen could stand and not be in the way of the facial mocap cameras. They were triangular shaped spaces that were soon dubbed “pie” (see Mocabulary).
Wheels, The Virtual Camera System

4.1 Wheels, The Virtual Camera System
The camera plays an important role in a Zemeckis film. The fluid, complicated camera moves are a trademark of his movies and are used as an essential storytelling tool. For The Polar Express, Imageworks created a real-time camera system which simulated the experience of using on-set camera controls to encourage creative experimentation with the camera as well as provide natural, “live-action feeling” camera moves for the film.
Imageworks created an interface that allowed the director of photography to control the camera using a set of “wheels,” This allowed for the D.P. to control the camera in real-time while watching the virtual set and the low-res version of the actors on his monitor—a very similar process to operating a camera on set.
Imageworks staff, in conjunction with the director of photography, worked with the “wheels” system to keyframe the translational position of the camera, in effect controlling how the camera was pushed digitally through the scene. When giving demonstrations of the system, these operators actually referred to themselves as the D.P.’s digital grip.
 Wheels had a direct impact on several aspects of the production. In a traditional animated film, everything is storyboarded down to the last detail, including camera angles, before production begins. With Wheels, after shooting the movie and choosing the “selected” performances, the set could be covered from as many different camera angles as made sense for each scene. All those “takes” were laid off to video, sent to production editorial, and served the same purpose as dailies in a live-action movie. Production editorial then cut the shots together to edit the film. If editorial needed another angle for a given shot or wanted to adjust the camera move to help an edit, they would simply call up the wheels department and request whatever they needed. Since the wheels system was very efficient and could “shoot” many minutes of footage per day, the process was very fluid and flexible.
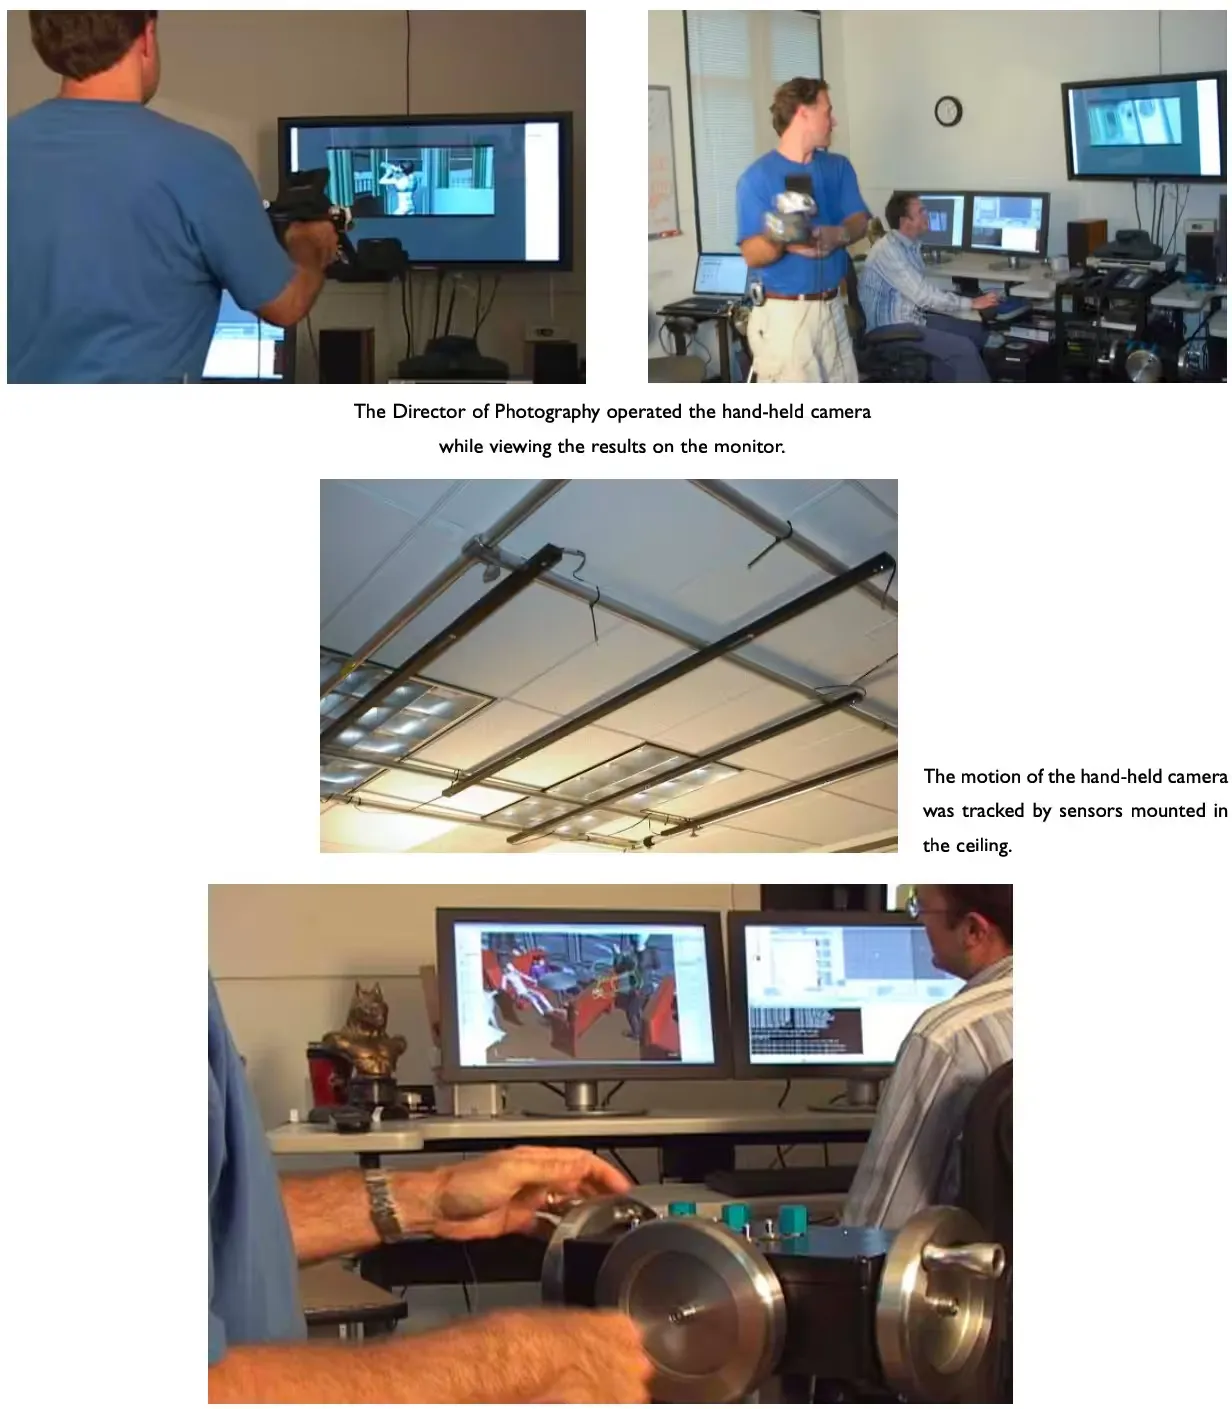 The Director of Photography operated the wheels in real-time.
Performance Animation

5.1 Performance Animation
The performance animation on The Polar Express can be broken down into a three-stage process.
First, the Integration Department took the mocap data and applied it to each character, making all the necessary adjustments. Since the proportions of the characters in the movie are different from those of the actors, not everything lined up.
When Tom Hanks played the Hero Boy, Integration had to make sure that every time he touched part of the set or interacted with another character, his child-sized CG character did the same thing.
Second, key-frame animation was layered in addition to or on top of mocap data, which allowed blanks to be filled in without losing the mocap information.
5.1 Mocap Integration
The motion capture integration team worked with the show’s Editorial department to put the mocap data onto characters and into scenes.
There were 5 integration leads and 25 integrators when the department was at full capacity. The initial goal was to integrate the mocap data in parallel with the stage shooting. Every third week, the stage would take a one-week hiatus to allow Robert Zemeckis to place virtual cameras on the integrated scenes with Wheels.
Ideally, this process would be complete for the entire first pass of the movie two weeks after wrapping the first unit shoot. The reality was that this first “rough integration” pass went on for six more months.
Last, certain characters and elements were completely key-framed. For animators, that meant enhancing the mocap animation by making any necessary alterations and by animating elements that hadn’t been captured.
There were no markers on actors’ eyeballs, eyelids, tongues or fingers, for example, and those were major expressive elements that animators infused with life. Some characters were entirely keyframe animated including all the animals (e.g. the wolves, the herds of caribou) and the ticket when it takes flight.
After the shots had been created in Wheels, Editorial assembled a first cut of the movie. Once this was approved, each shot came back to integration a second time. The models were upgraded to high resolution and the facial mocap data was tracked only for the portions of time that it would appear in actual shots. Tracking the 152 facial markers was far more labor intensive than the 72 body markers, and required a greater degree of accuracy.
5.2 Rough Integration
The use of motion capture data on this scale was a new challenge to Imageworks. Even the terminology had to be worked out so that it would not clash with terms commonly used in live action features. Rather than a “shot,” each motion capture take was called a “beat.” Rough Integration cut the beats together into the equivalent of a scene, termed a “Performance Assembly” by production editorial who selected the beats and provided the timing for the edit.
The front end Digital Production Manager developed the management side of the process.
The beats were assigned a status in a database created for the project. Once the tracking part of the process was complete, they were given to an integrator to retarget the motion from the performer onto the character, add the props, and
clean data problems. When all the beats were retargeted the assembly process could begin.
Scheduling became vital to manage all the assets need for the workflow of the department.
For Robert Zemeckis, one of the attractions of the process was the ability to combine performances from multiple beats. This allowed for Tom Hanks as the Conductor to interact with Tom Hanks as the Hero Boy. For Production Editorial, this was a matter of cutting together the video reference cameras from the stage. Integration used the same timecode to cut the mocap data, using an Avid-style editing tool created by Imageworks. Predictably, such interactions required some cleaning up to make them work believably.
5.3 Fixing Scale Issues
Because the child characters in The Polar Express were all played by adult actors, scale was a complex issue. There were two versions of each of the sets on the Mocap Stage. One was regular size, the other was 120% scale. This was only partially successful, as the adults were all a different height in relation to their child characters.
Kaydara’s Motionbuilder was new to the marketplace when The Polar Express started. Fortunately it was a huge step forward from Kaydara’s previous product “Filmbox” and was one of the main tools used for fixing these problems.

5.4 Imageworks Plug-Ins
During the course of the show, several members of the integration department developed custom plug-ins to handle the specialized requirements of the show. Technical Directors created a range of custom control rigs that redistributed motion to make up for the lack of spine and clavicle rotation in the body data. Another plug-in allowed integrators to play up to a hundred characters in real-time. Another TD even created a Python interface to the functions available in the Motionbuilder SDK. This allowed Integration to create a new Version and Publishing system, and a way of importing the editorial lineups into the Motionbuilder NLE.
Timecode was one of the biggest issues on the entire movie. The timecode on the set was captured at 29.97 fps or NTSC. The data was captured at 60 fps. If this weren’t bad enough, the video reference was captured at 24 fps. Despite the toolsets that were developed during the show, visual “sync checks” were always required to catch stray timecode issues.
5.5 Final Integration
By the time Integration entered its second stage, all the camera shots had been created in Wheels with Robert Zemeckis. Apart from final cleanup, the biggest challenge at this stage was the application of the facial motion capture. The markers used to capture the data were much smaller than those used for the body data, and so were much more susceptible to noise and occlusion by props, set pieces and other actors. When the data was applied, minute offsets in the markers’ positions could result in entirely different expressions.
The eyes were the most problematic area, since the three markers on the upper eyelids were so close together, and often touched the markers on the lower lids when the actors closed their eyes. Eventually, only the timing was used for blinks, while the eye shape was driven by the direction that the animators set using the eyeball controls.
In addition, the dynamic motion of the actors’ faces sometimes appeared odd when applied to the younger characters. Although this was scaled down, the integration department attempted to preserve some of the motion, as it added an extra sense of realism to the performances.
As soon as there were shots to work with, Integration used the camera views to make sure that the body motion worked as well as it could inside the camera view. The removal of data noise became far more critical as the cameras moved closer to their subjects. Final postures were corrected using the custom rigs in Motionbuilder, and joint rotations were distributed to assist the deformations of the CG character’s skin.
 A labeled user interface for the facial integration.
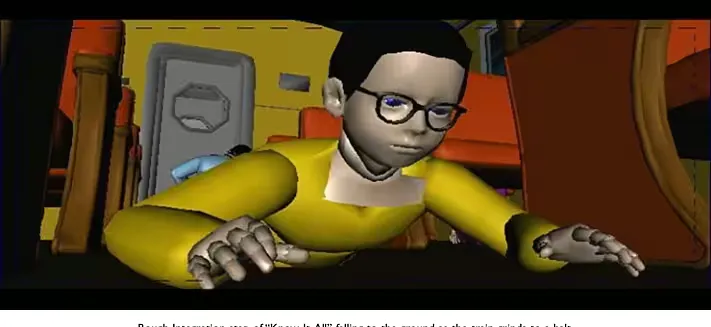
 Final Integration step of ‘Know-It-All’ falling to the ground as the train grinds to a halt.
5.6 Animation On Top Of Mocap Data
Several animation methodologies were used to embellish and refine motion capture performances. Each character was equipped with a mocap control rig as well as an animation control rig. In all cases, the source motion capture remained intact on the mocap rig and was never deleted, modified or compromised. Keyframed elements of a performance would be executed on the animation control rig, and the animators could blend between mocap and keyframed animation as desired. Each character also included a mocap-offset rig on which the animator could execute additive animation on top of the motion capture. The resultant motion was a composite of all three sources: mocap, mocap offset and animation control rigs. The shots were delivered to Keyframe Animation from Integration as Maya files with all the assets embedded, including audio tracks and all the pertinent video references set up on image planes. With the performance capture as the foundation, the keyframe animation team filled in the blanks to match the video reference as closely as possible.
The only time substantive performance changes were made was when the shot was accompanied by notes from the director requesting specific performances changes. For example, Zemeckis would ask to have a character look left instead of right, or do a double-take at a specific moment.
At the beginning, it was hard to resist the temptation to “help out” a performance but soon there was adjustment to the goal of replicating performances without further interpretation.
An area that regularly needed embellishing was body dynamics when acted upon by some external force not captured on set. Those motions - such as the illusion of a character affected by a rocking train - were typically animated on the mocap-offset rig.
If two unique mocap performances were pasted together, the animator would typically blend out of motion capture at the transition, keyframe an effective transition, then blend back to motion capture for the rest of the performance.
At best, the motion capture system was able to resolve 80% of the performance. All of the secondary details were left to the animators.
Secondary animation also included loosening up the spines and shoulders of the characters which were inherently very stiff straight out of motion capture. Detailed work with hands and fingers were also keyframed as well as all of the props that the characters interact with.
 Hero Boy’s skeleton as it relates to Hanks.
5.7 The Eyes
The control system and method for animating the eyes was in constant development throughout the duration on of the project. Attempts were made to capture the eyelids and the movement of muscles surrounding the eye.
Markers were placed on the eyelids but when the eyes opened, the lids tucked up under the fat pad below the brow and the markers disappeared. The tracking system could not solve for the missing markers and the end result was noisy and unreliable data in the critical region of the eyes. It became apparent very quickly that the markers would have to be turned off, and the shape changes around the eyes (brow to cheek bone) would have to be driven through procedural methods based on animated eyeball rotations.
Specific shapes were modeled for the extreme up and down orientations of the eye because of the elaborate shape changes and wrinkles that form under these conditions.
Left-to-right deformations were driven by the facial muscles built-in to the Imageworks patent-pending “PFS” (Performance Facial System). Since the corneal bulge also deforms the lids (especially visible in the lower lid) as the eyeball rotates, and special deformers were built to reproduce these subtleties as well.
These automated deformers worked well in most cases, however, the animator also had the ability to override the automated function and animate the deformers directly, or on top of the automation to achieve precise results.
Every effort was made to emulate the natural behavior of eyes in animation. The eyes are constantly in motion. This is because the retina only has a small region of high acuity about the size of a thumbnail. To explore an area, the eyes are constantly moving over a scene in short intermittent bursts called saccades. Even the brief moments of fixation include a certain level of noise that had to be animated in each of the closeup shots. This detail is barely visible, but more perceptible perhaps on a subliminal level.

5.8 Fully Key-Framed Animation
Many elements of The Polar Express were executed using traditional keyframe techniques exclusively.
All of the animals including the wolves, eagles, caribou, and reindeer were animated by hand. Smokey and Steamer (the engineer and coal tender) were initially performed by Michael Jeter, but ultimately evolved into key-framed performances that were more stylized.
Characters that were entirely key-framed included all the puppets in the puppet car, the flying ticket and much of the hero elf work.


5.8.1 Smokey And Steamer

An attempt was made to capture Michael Jeter performances on set and retarget that data to the 8-foot tall Smokey and 4-foot tall Steamer. Retargeting was generally unsuccessful due to the huge size discrepancy between the actor and these characters.
The gravity and physics did not translate well, so Zemeckis thought it would be best to animate these characters traditionally instead. He also thought that this would be a great opportunity to take their performances over-the-top with a lot of slap-stick gags. The goal was to make them cartoony, while believable dynamics and gravity kept them grounded in the real world that they inhabited. First up was a song-and-dance routine, which was the original Imageworks’ animation department pitched storyboards and gag ideas to Zemeckis, and the sequence evolved from a rough animatic into fully articulated animation.
Due to revisions in the story, this sequence was cut from the film. However, it was a great development piece that defined the personality of these characters and how they carried themselves in all subsequent sequences. A completely revamped, muscle-based system was used for the facial animation since there was no need to incorporate facial motion capture with these characters.
The creative collaboration continued with more gags and boards being pitched for each new scenario and predicament with which Smokey & Steamer were faced.


5.8.2 The Ticket Ride Factoids
- A 2 mile camera path
- 19 humans
- 27 wolves
- 6 matte paintings
- 1 Eagle, 1 Eaglet
- Over 300 unique elements are rendered to create the wolf sequence (162 shadows, 141 beauty, 5 vfx)
- Each wolf had 1.6 million hairs
- … 27 wolves total meant 43 million hairs were rendered when all wolves were on screen
- 6 unique environments were built for this sequence covering approximately 8 million square feet
- 3000 lines of software code were required to calculate the eagle feather lighting
- There are over 150 trees in the environments of 6 types from furs to “dead trees”
- At one point, the eagle was calculated as flying at a speed of mach 1.5 down the waterfall
- The number of cars in the train changes from 6 to 21 to 14 to 5 at various points throughout the sequence
- The train was 21 passes (engine, coal tender, 18 passenger cars, and the observation car).
- The ticket had 18 render passes, including 14 specular highlight passes.
The ticket ride shot is more than two and one half minutes long with a continuous camera move that follows the lost ticket on its journey away from the train and back again. It was the first shot into animation and the last shot out. The sequence was initially storyboarded as a much longer piece that included dancing bears, beavers, snow bunnies and more. Much of this was executed in animation, but it was also a sequence where Zemeckis explored many creative variations. At one point the ticket was to come alive and have a motivation of its own to find its way back on to the train.
With this as an objective, Imageworks’ animation department pitched storyboards and animatics to the director before embarking on the task of bringing the ticket to life.
The ticket was rigged for the anthropomorphic behaviors defined in storyboards, and animation the proceeded down this path for several months. The pantomime animation of the ticket was reminiscent of Aladdin’s carpet. The ticket could also perform origami on itself to become a paper airplane, a boat and a parachute. Two months before the scheduled delivery of this sequence, Zemeckis reverted back to the idea of the ticket floating serendipitously on the breeze (a la Forrest Gump feather), and the entire sequence was reworked to meet that goal.


Timeline


5.8.3 Caribou And Elves
A flocking system was used for the herd of caribou. Multiple cycles were animated—fast walk, slow walk, trot, run, lingers, etc. - which were called “states.” Transitions to and from each state were also created. The animated states and transitions were passed on to the effects team where vast expanses of the environment were populated (for more detail, see Flocking System).
Several of these shots required close up animation of the caribou, and the cycles were often used as a starting point for these foreground heroes. A similar approach was used with the elves; however it was possible to use more of the motion capture data for the vast crowd system. Much of the elf behavior could not be captured, however, since Zemeckis wanted the elves to climb on top of each other to form various structures. While this was attempted on stage by acrobats, the results achieved in animation appeared much more interesting and effortless - because elves do this every day, after all.

Long after the stage production wrapped, Zemeckis would continue to come up with more ideas for elf business and gags. A motion capture stage was set aside for this secondary work, but it turned out to be more efficient for the animators to keyframe these performances.
5.8.4 Flying Reindeer
Several weeks were invested in the task exploring how to make reindeer fly convincingly, from pulling the sleigh around the North Pole to the initial scene of being loosed from their pen on Christmas Eve. Traditional 2D animatics were sketched by an animator to define key poses, and those poses translated to the reindeer rig once the ideas were approved. The animation of the “freeflight” reindeer was a single 12-second cycle. The cycle was applied to all eight reindeer in the procession, and the timing was offset between them. Because the cycle was sufficiently long, each reindeer appears to have unique movement characteristics of its own.
As the reindeer rise off the ground, there is a group of elf tenders that try to hold them down. These elf performances were attempted on the mocap stage by hoisting mocap actors up on harnesses. In the end, none of these actions could be used since the reindeer animation is what was driving the shot, not the other way around. Instead, the elves were animated to interact more convincingly with the reindeer (and each other) - including some very fun and violent moments that would have caused serious harm on a mocap stage.

The original plan called for each reindeer in the procession to have four elves attached. However, each time the director saw the procession he requested that many more elves be added. After all, the reindeer are strong, majestic creatures capable of hauling Santa’s sleigh around the world.
Four little elves would never be able to hold them down.

Effects Animation

6.0 Effects Animation
The Polar Express has an enormous number of effects throughout the film. Almost every frame has an effect element. The challenge was not only to hit a high bar visually, but to do it as efficiently as possible given the large number of elements. This required streamlining the effects pipeline to handle traditionally expensive effects in a cost effective manner.
Effects elements that were pervasive throughout the film were identified. In these areas effects systems were built to handle them in mass, focusing on flexibility and efficiency. For a film that takes place at the North Pole, snow was an obvious candidate.
 Conceptual design for the “Crawler Rockets” which attach the present bag to the Zeppelin.
 Conceptual artwork for the Aurora Borealis “light show” that the kids experience as they approach the North Pole.
 Conceptual artwork of the boy’s bedroom including the effects element of the steam from the bedroom heater.
6.1 Let It Snow
Creating falling snow is actually fairly simple. But this film required snow in nearly every shot for static and traveling cameras, a variety of sets, and massive environments—and it needed to render efficiently.
Rather than simulate snow for every shot, the approach taken was to simulate as little as possible by using pre-simulated snowfall “blocks”— delaying control over the look and motion until the render stage. This allowed for a very simple generic snowfall system that worked for a wide variety of shots.
A modular system was built by simulating a single block of sparse snow and baking those particles out to disk. This baked sequence was loop-able, meaning the snow block could be played back for an infinite amount of time. These would act as “seed” snow particles and would be the basis for almost all the snowfall in the movie.
Since millions of snowflakes could not be simulated, which is what was needed to make the snow look realistic, a Renderman procedural plug-in was written to instance thousands more points for every seed point. At render time, through the plug-in, there was control over falling speed, number of flakes, flake size, wind direction, and wind turbulence. Since this all happen on-the-fly at render time, it was quite efficient to make sweeping changes to the look and motion without the need to re-simulate. To fill an area with snow, blocks could be added and arranged edge to edge to cover large areas or along the camera path.

Particle instancing would only happen when blocks were visible from the camera.
Later in the production, FX TDs came up with a better method. TDs parented a single snow block to the camera, keeping the camera in the center. As the camera translated, the snow block would travel with it, but the snow particles were counteranimated, locking them to the environment. As particles moved outside the block boundary they would wrap to the opposite side. This was called the “treadmill of snow” which allowed the camera to go virtually anywhere, travel at any speed, and never leave the snow volume. This method also helped with shot continuity since even small changes in camera speed were very noticeable in relationship to snowfall. By adjusting the counter-animation of the snow particles the apparent speed that the camera was traveling though space could be adjusted.
 Snow “voids” were used to keep snow away from a controlled area.
Falling snow needed to interact with moving objects like the train. Hero effects like these were achieved through a combination of fluid simulation techniques

6.2 Snow Occlusion
Instead of placing snow where it was desired, artists simply placed snow everywhere then removed snow that was undesirable. Ways to remove snow from under objects such as the train or inside houses had to be devised since the snow blocks knew nothing about the environment they were placed in. A shadowmap was rendered from a camera high above the environment. This image was used as an occlusion map in a snow shader which simply faded the opacity of any particle in shadow to zero. Our system also included “snow voids,” simple elliptical volumes that could be placed in a 3D scene to remove unwanted snow.
6.3 Footsteps In The Snow
Snow also had to be interactive, since characters walked and slid through it. An efficient system for pushing and displacing snow for multiple characters, creating snow mounds, and throwing off particles for a realistic look was required. A footstep system was built, utilizing Houdini Digital Assets to automatically generate displacement maps where characters interacted with the snow. The maps were used not only to depress the snow where characters walked, but also to generate mounds of snow at the leading edge of a slide and as a source for secondary particle systems. The system took a character, collision geometry and a camera as input and automatically wrote out displacement maps and particle source geometry.
The system worked by placing a camera below the ground plane to capture where the character intersected the ground. Through the camera, floating point images were rendered to measure the ground plane’s depth, the character’s depth, the character’s velocity and the camera’s projection matrix. The images were accumulated over time using Imageworks’ compositing system called Bonsai to create the snow trail.
The resulting displacement maps stored separate data in 3 image channels. One channel simply stored the depression data, or the “trough.” The second channel was used to create the “pushing” snow.
To build up “pushing” snow in front of a foot while it slid, the depth data was smeared forward using the velocity channel of the images and inverted to create a “leading edge” snow mound. A third channel was used to store a ridge around the whole depression.

The resulting texture maps were used as a mask for a displacement shader. The camera matrix stored in the displacement map was used to re-project the images onto the ground plane. Using the data captured, the ground plane was pushed down in the trough area and up in the leading edge and ridge areas. Finally, small details, like cracks and crumbles, were added to the snow at render time in a procedural shader.
Another benefit of using maps for footstep displacement is that it scales very nicely.
Many characters intersecting the ground could be rendered into a single sequence of displacement maps. If they couldn’t be rendered all at once in memory, they were rendered in separate passes and composited later.
6.4 Snow Particles
Building off of the footstep displacement maps, using the velocity and intersection data, a 3D curve was created in Houdini that represented the intersection between the character’s feet and the ground. At each point on that curve velocity was stored. With that, particles burst off the curve at the right speed and direction as if they’d come off the character’s feet. After being ejected into the air, these particles could either dissipate or, for the hero shots, create extra “divots” in the ground by running a secondary footstep pass where particles landed.


6.5 Footstep History
Many shots required a trail of footsteps to be faked behind characters. Rather than creating pre-roll animation for those footsteps, the Footstep History system was developed. A 3D curve was drawn on the ground and geometry of the foot was copied along that curve. The system had controls to set and randomize footstep spacing and orientation. Fake velocities of each step were approximated and used by the rendering system. It was tremendously efficient.

After getting the trail to look right geometry was passed into the footstep rendering system to generate the displacement maps.
6.6 Splat
A big innovation for The Polar Express was Imageworks’ new renderer called “Splat”. Splat’s namesake served the dual purpose of filling the acronym Sony Pictures Layered Art Technology and describing its rendering technique of splatting down paint strokes using a painter’s algorithm. Splat was actually designed early in the process in an effort to simulate a nonphotoreal painterly look for the imagery.
Although this look showed promise, it was eventually set aside for a more detailed rendering approach. As a result Splat was re-purposed to create smoke, steam, atmospheric fog, snowfall, sparks and ice shards.
There is a huge amount of smoke and steam in The Polar Express , both of which needed to have a very volumetric look. Traditionally, volumetric smoke is hard to direct because it is extremely slow to render, often taking hours per frame, which doesn’t allow for many iterations. These traditional approaches weren’t practical given the nmber of shots that had to be produced. Splat dramatically sped up and simplified this process.
Splat is essentially a very fast sprite renderer, operating in conjunction with consumer level NVidia graphics hardware to accelerate the renders.
Splat takes particles generated from Houdini or Maya and copies textured cards to each particle. To create smoke, a noisy smoke texture was put on each card. With thousands of these cards layered up, each one with a little opacity, it looks like smoke. This is a very well known approach to rendering smoke, but by using graphics hardware to accelerate the process, many iterations were rendered, most renders running in seconds, rather than hours per frame.
Particle texture, color, size, etc., were defined within Splat using procedural operators that could act on any particle attribute. This allowed for great efficiencies when changing the look of the smoke or steam. It was unnecessary to go back into Houdini and re-bake the simulations, which could be a time-consuming process.
Instead, anything to do with the look could be adjusted within Splat and the animator only went back into Houdini if the motion changed dramatically


6.7 Smoke Shadowing
Shadowing is the key feature in making smoke look volumetric, though it’s also one of the features that slows down rendering. To remedy this, Renderman’s Deep Shadow support was built into Splat using Renderman’s API. Splat can directly render Deep Shadows very quickly to store transparency data, dramatically increasing the quality and speed of the smoke. When tested, true volumetric renders that previously took 17 hours per frame to render only took 10 minutes to render in Splat. Smoke and shadows rendered so quickly that numerous iterations could be performed—in effect allowing for art direction of the smoke and shadows.

To accomplish matting for smoke elements both behind and in front of characters and other objects in the scene an image-based 3D matting technique was developed.
The lighting department automatically rendered a secondary deep shadow image from the camera for every beauty render. This shadow image was used to store the depth of every surface from camera.
Once loaded in Splat, each pixel of the smoke could be tested against this image for occlusion. This is similar to z-matting except 3D matting is achieved accurately against transparent objects and anti-aliased edges. With this method, matting was done properly against shader transparencies and displacements which wouldn’t have been possible by using geometry.
 Each card in the smokestack is given a random color to illustrate the number of particles and their respective layout.
 Smokestack with only the top rim light
 Smokestack with only the bottom rim light.
 Smokestack with only the front fill light.
 An example of 3d matting from within Splat.
 The final rendered smoke column with all lights.
6.8 Particle-Emitting Rigs
There were so many shots of the train’s smoke stack that it was more efficient to automate particle generation. That way, the look of the smokestack remained consistent from shot to shot. Since the hires geometry was extremely slow to load and work with, a low resolution proxy of the train was generated for every animation.
A particle-emitting rig was created that automatically attached to the proxy geometry where the particles (i.e., the smoke stacks) were to emit, and the rig would follow the geometry wherever it went. Each attached rig had a control panel that allowed control over aspects of the particle generation, such as how fast the smoke churned and how fast it moved out of the stack. This was used successfully not only for the smoke stacks but for the steam vents, the engine cabin, ice shards and sparks.


6.9 Flocking System
The Effects Department was responsible for generating huge crowds of both elves and caribou characters. The system animated all but the very closest hero characters which were handled in the Animation Department. The flocking system was built from scratch using a combination of software. Maya for modeling and animation, Houdini for assembling and simulating animations, and eventually on to Renderman to handle rendering the many thousands of characters needed per frame.
The pipeline started in modeling, generating models with three levels of detail to match the approved hi-resolution characters.

The lower resolution models were derived from the highest one and maintained UV coordinates as closely as possible. This allowed use of the same texture maps for all geometry resolutions. The animation, whether motion capture or keyframe, was transferred from hero animation rigs to a simplified skeleton built specifically for flocking.
In this way the flocking characters could source any animation in the library. Maya MEL scripts were written to translate the skeletons, animation curves and skin weights to Houdini where the flocking behavioral system was built.
Each character had a library of short animation clips (walk cycle, walk to a stop, stop to a walk, walk to a run cycle, etc.), which were loaded into CHOPS, Houdini’s channel operators. The links between each animation clip were defined by building a lookup table that outlined all possible transitions connecting each of the animations. If animations failed to link up perfectly, the animation channels could be post processed to ensure smooth transitions using CHOP filters. Next, a custom particle operator in Houdini was written to control all this motion data, with each elf or caribou represented by a single particle.
Each particle was assigned a beginning orientation, animation clip, and end goal. Particles used the animation lookup table to achieve their goal while avoiding neighboring characters and obstacles. Each particle marched along at the exact rate of the animation assigned. Once the animation reached a transition point, the particle would choose between the available animations, selecting the one that would take it closer to its goal while avoiding obstacles.
There were in excess of 50,000 characters in some shots, which was far too heavy to load into memory at one time. To render, a Renderman procedural plug-in was written that talked directly to Houdini through an open port. Each time Renderman hit a character’s bounding box, it requested the character from Houdini, which in turn deformed the geometry and sent the data back to Renderman. In this way characters were deformed on the fly and no character was ever generated unless it was visible. The plug-in also made use of Renderman’s level of detail facility to fade between the various resolution models depending on their screen size. Lower resolution models were chosen for characters that were small on screen, dramatically decreasing the render time. Most crowd frames were rendered in well uder an hour.


Lighting And Rendering

7.0 Lighting And Rendering
After looking at the original book and conceptual artwork created by production, the Imageworks look development and lighting teams knew they had a high mark to hit. The dramatic environments in the mostly night-time film provided many opportunities to create the storybook feel demanded by the artwork. In addition, this was the first time that Imageworks had taken on the challenge of rendering an entire film, which naturally meant creating, painting and rendering every element of every scene in the 90 minute movie.


7.1 Lighting Techniques
7.1.1 Ambient Occlusion
Ambient occlusion techniques for The Polar Express consisted of a screen space projection pipeline. Each frame of the film was rendered with ambient occlusion shaders without motion blur. When the beauty pass was rendered, the ambient occlusion map was re-projected back into the shader where it was used to perform the lighting calculations. At several points during the production, tests were performed to compare the performance of the re-projection pipeline as compared to a “baked” occlusion pipeline. For the sake of optimization, it seemed logical that baking the occlusion information into a series of texture maps once for each environment would be a large payoff. However, on The Polar Express, the sets were very flexible and had built in “wild walls” (walls that could be moved for each set). This, combined with the fact that the props were typically adjusted on a per shot basis, tended to outweigh the time saved by baking the ambient occlusion textures into the sets. The projection method of using ambient occlusion therefore became the primary occlusion pipeline for the show.

Whenever a re-projection method is chosen for a lighting component, the artifact of motion-blur needs to be addressed. In short, with reprojection you only get one value for each pixel yet, taking into account motion blur, a pixel may be contributed to by more than one surface.
In The Polar Express, many shots had fast moving motion blurred objects in the foreground which would cause artifacts in the form of sharp incorrect lighting around the edge of the otherwise blurry object. The solution was to render one ambient occlusion pass without motion blur, a shadow pass from the same camera, and then a special ambient occlusion render which took the shadow pass as input and yielded the ambient occlusion value for the second forward facing surface. The final lighting calculation was enhanced to be able to take as input all three of the above images and automatically choose the correct ambient occlusion image for each of the lighting calculations. This solution worked in 90% of all cases where motion blur artifacts were present because of re-projection.


![]()
7.1.2 Compositing
Because of Imageworks’ history as a visual effects house, the artists were used to achieving effects through a variety of techniques, including compositing. Although some shots were created nearly entirely “in-camera,” most shots received some amount of composite work either for expediency or to help to achieve an effect not possible in 3D.
Similar to traditional visual effects techniques, the artists rendered the “beauty pass” which most closely represents the final frames of the film and also numerous control passes, including Z-Depth passes, normal passes, deep shadow passes and, commonly, a world coordinate pass. These passes were used to touch up the lighting in the comp. It also allowed creative notes to be addressed in a timely fashion late in the production cycle of the shots without going back to the rendering process, which would have been very time-consuming.


7.2 Team Structure
Imageworks structured the lighters in small teams, comprised of five to eight people who focused on a sequence of the movie at a time, rather than individual shots. This allowed for the sequence supervisor (the team lead) to work closely with the team early in the life of a sequence to help define the look and feel while simultaneously satisfying all the scenes’ technical requirements.
Imageworks also formalized the position of the ATD (associate technical director) to handle shot set-up. This job consisted of pulling together all of the elements from the various departments—hair, cloth, animation, layout, effects—and assemble them together for the first time in the 3D lighting package preparing them to be lit. The ATD’s also ran all the technical passes required to light a shot including ambient occlusion, the shadow maps, deep shadow maps, and the first “beauty” renders.
There was a lot of interaction and troubleshooting on the part of the ATD with the various departments. Since this extensive workload was handled by the ATD it helped keep the lighters busy lighting and completing shots.

Two Lighting Examples
7.3.1 The Hobo Skiing Sequence
Often times, shortcuts in one department had ramifications in lighting, which required the Lighting Department to maintain a level of flexibility. For example, the 4 to 5 minute sequence where the boy meets the hobo on top of the train is quite long. The set for the train would physically have needed to be over 10-miles in length. Modeling and texturing that environment would have taken much too long. The solution was to build one set about 1/2 mile in length and run the train back and forth over the same 1/2 mile throughout the entire sequence.
To maintain the illusion of continuity, two distinct lighting setups were created: One with the moon on the East and another with the moon in the West. The East moon was used while the train was moving North and the West moon while the train was heading South. In that way, the moon and the rest of the lighting rigs always stayed on the correct side of the actor and the lighting appeared continuous. When the train went up and then down a hill, modelers and the look development artists made three separate environments: the flat valley, the uphill environment and the downhill environment. Because of the number of trees, they were broken into layers: Trees within 50 yards of the train track were high-resolution 3D models with 3D leaves and snow pads and 2D cards oriented at the camera for trees more than 50 yards away. The 2D cards looked like the 3D trees because they were textured with a rendered image of the 3D model. The look development TDs completed the illusion by rendering the 3D trees from 36 different angles, so as the card rotated, the 3D image projected on the card changed to match each changing angle. This changing angle gave even these far-away trees the illusion of being 3D.
To create the vast environments, the shader writers and look development TDs used a tiling system—painting bump maps, frost maps and color maps in repeatable tiles and projecting them over the entire environment in various sizes and patterns. The tiling system started with a naïve method that simply repeated the texture throughout the environment and then texture painters could manually paint override maps to help hide repeating patterns. If a section failed to hold up to the scrutiny of a close-up shot, a bump map or color map was painted just for that section.


7.3.2 Ice Lake
Some interesting lighting challenges occurred when lighting and compositing could help bring out important story points. One good example of this is the scene where the train starts sliding across the ice and becomes stuck in a giant ice lake.
Zemeckis wanted to ensure that the audience did not get confused about which way the train headed throughout the disorienting sequence. To accomplish this goal, artists focused energy into making sure the audience understood that the train was heading North.
This was accomplished by laying out a distinctive iceberg with a V-shape on the North side of the environment where the train would eventually find its tracks. The production designer contrasted that with the South side, which had rocky spires that looked quite distinct from the North side’s iceberg. As every shot was lit in this sequence it was important to maintain the contrast between the ice walls and rocky sides south side of the lake.
The Ice Lake sequence was an excellent sequence to feature some spectacular effects animation in the film. The lighting and effects artists have a great deal of interaction with each other to accomplish the sequence’s technical and artistic goals.
One good example of the close interaction between lighting and effects took place when the ice under the train begins to crack. The lighter removed the “standard” environment ice lake and substituted a RIB file generated by the effects department which held the cracking ice lake specifically generated for the shot. The lighter would make sure the new lake was lit and textured appropriately as well as integrate the animated texture maps created by the Effects Department which were used to displace and shade the ice lakes as the train’s wheels scar the ice. Ice chunks thrown up from the lake were also passed to the lighter as RIB archives and lit and integrated into the scene. The sequence also featured water spraying up from the ice lake as the train begins to break through the frozen layer. The Effects Department rendered the water with the separate red, green and blue channels of the image representing lighting from different directions and different levels of specular illumination. The lighting artist could then integrate the water elements in the composite.


3D Imax

8.1 Overview
In addition to the many firsts set by the feature film, The Polar Express also had many firsts when it came to its adaptation for the IMAX screen.
The project was the first feature film to be simultaneously released for 35mm projection and in IMAX 3D. It also has the distinction of being the first feature-length all-CG project to be created in stereoscopic 3D. Both the director, Robert Zemeckis, and star, Tom Hanks, were big fans of IMAX and everyone involved was excited by the prospect of creating a truly unique movie experience by adapting the film for IMAX 3D.
About halfway through the 2D project, Imageworks was approached to do several test shots and sequences in 3D. In December 2003, artists converted a 30 second shot from the beginning of the film into 3D. Everyone involved agreed the test looked great but wanted to see how an action scene might translate to 3D, so another test was commissioned. This time the artists converted a sequence of shots involving the hero boy stopping the train to allow another passenger to board. After seeing the results, Zemeckis, IMAX and Warner Brothers decided to move ahead with the project.
In May 2004, Imageworks got the green light to create the 3D version, giving them less than six months to adapt the film from 2D to 3D, all while the film was still being made. The goal was to complete the 96-minute project (the longest IMAX 3D film ever made) in time to release it on November 10th, the same day as the 2D version of the film.
In order to keep from impacting the 2D project, Imageworks assembled a separate production team of 60 artists and support staff.
With a separate staff, the IMAX 3D team had to ramp up quickly on the production techniques being used on the 2D project without slowing the 2D team down.
In converting the film to the large format, a few compromises were made to help assure completion in the short schedule allowed. First, it was decided not to adjust the format of the picture. Even though the IMAX format allows for a much squarer aspect ratio than the 2.35:1 aspect ratio used for the theatrical release, it was decided to try to preserve the artistic vision of the director and keep the same composition in both versions of the film. Had a different aspect ratio been used, the team at Imageworks might also have exposed parts of the virtual scene that had never been meant to be seen or had never been animated. Another compromise was that the images for the IMAX release were rendered at the same resolution as the theatrical release.
The IMAX DMR (Digital Re-mastering) process has been used for many years to adapt lower resolution films for the large screen and using the same image resolution as the 2D release allowed the 3D team to reuse 2D elements, if needed, without having to re-render. Also, the theatrical release of the film was put through a comprehensive digital color timing process.
Because the color timing of both versions of the film needed to be done concurrently (and the resources weren’t available to digitally color time both versions), the IMAX version of the film was put through a separate overall color correction that approximated that of the theatrical version.
8.2 Adapting A Shot For Stereoscopic 3D

8.2.1 Restoring The Data
Only after the director approved a shot for inclusion in the theatrical release would the IMAX 3D team start work on adapting the shot for 3D. The first step in this process was to restore all the data needed to recreate the shot to the disk volumes used by the IMAX team. The primary goal of this step was to load as little data as needed but to ensure that all data needed to exactly reproduce the 2D version of the shot was brought back online. Normally during shot production many takes of the various animation files and other elements used in the shot are created. The IMAX team would only load the elements that had actually been used in the final shot. Additionally because all scene renders were generated from Imageworks’ proprietary geometry format and because the IMAX team didn’t need to reanimate the scenes, it was unnecessary to restore animation Imageworks’ proprietary versioning and files.
The publishing system was used to keep track of all elements used in the theatrical release and to target the files that were needed for restoration. In many cases this included old texture files and material properties that might have been updated since the original shot had been approved.
8.2.2 Creating The Stereo Camera
Creating a 3D shot started with converting the 2D camera from the theatrical release into a stereo camera.
The IMAX team at Imageworks consisted of a small number of camera TDs whose job was to create the stereo cameras keeping in mind several criteria.
For the first step in the process, the camera TDs analyzed each shot and determined where the action was. They would then produce a pair of cameras (one for each eye) that were parallel to the original camera and separated by a small horizontal distance. The only variable in this process was the inter-ocular distance—but selection of the correct distance was key to a good 3D experience. It was important that the separation be as far as possible to maximize the depth effect while not being so deep that it would produce eyestrain. Additionally, it was important that when cutting from one shot to the next that the perceived depth of the shot not change too much. The point was to create a flow of images that wouldn’t fatigue the eyes. In some shots it was necessary to animate the inter-ocular distance as the shot composition changed.

Because one of the goals of the project was to reuse elements from the theatrical release as much as possible, it was advantageous to create the stereo camera pair with one camera identical to the original camera. In most cases this was possible, as the apparent composition of the shot wouldn’t change by creating the other camera slightly offset to one side or the other. These “offset camera” shots typically would place the left eye camera coincident with the original camera and create the right eye offset the inter-ocular distance to the right. In shots where the composition would be compromised by an offset camera (because objects were too close to the camera or a centered composition was needed, such as when train stopping in the center of the screen), a “centered camera” would be created. As the name implies, a “centered camera” was set up so that the left and right cameras were offset equal amounts to the sides of the original shot camera.
Camera tests were generated using default gray shading and projected within the cut in Imageworks’ in-house digital 3D viewing room for final approval.
 An in-depth presentation of the stereo Panavision camera test render and the final composite!
8.2.3 Finishing The Shot
Once the cameras were approved, the effects and shots TD’s took over. It was the job of these teams to reproduce all of the elements, as needed, using the new cameras and to composite the shot.
In many cases the team was able to use compositing tricks to achieve a depth effect on the effects elements and avoid re-rendering.
However, most of the volumetric elements (snow, steam and smoke) required new renders.
The effects team would restore the animation files needed and then re-render the elements in stereo using either Splat or RenderMan. Shot TDs handled the job of rendering the remaining elements and compositing the final shot. More than half the crew on the IMAX production was composed of shot TDs. The shot TD would start a shot by identifying all the 2D “opportunities,” which were elements already rendered that they wouldn’t need to rerender as 3D elements. Many background elements in the outdoor scenes didn’t need to be re-rendered either because they were far away or because they were covered by 3D snow, which hid the flat nature of the element. Since many of the matte paintings had already been created using 3D matte painting techniques, for those shots that needed it, conversion to stereo was trivial.
The general process of recreating a shot in stereo was to first ensure that the artist was able to recreate the 2D shot. The artists would first composite all the left eye elements and verify that the left eye render looked qualitatively the same as the original. If differences were found, they would resolve them before proceeding with rendering or compositing the other eye. Much of the work in the conversion involved managing the many layers of the shot, ensuring that each layer matched the original and correcting the composite to account for stereo-induced artifacts.
Shots would be reviewed in Imageworks’ digital 3D projection room before being sent to IMAX for the DMR process. Every shot TD on the project was responsible for managing several shots at a time and would produce (on average) 2 shots per week. As artists became more proficient at juggling the shot load and as the tools for recreating the shots became better, several artists were able to produce as many as 4-5 shots per week.

8.2.4 Tricks To Avoid Re-Rendering
In order to keep the process as efficient as possible, a variety of techniques were employed which would allow the IMAX crew to reuse elements without rendering them in stereo.
In some cases an element (or even, in one case, an entire shot) could be used in both eyes with no adjustment whatsoever. These elements would usually be background elements of wide shots.
The same technique would be slightly modified by taking an element that was mostly planar (aligned to the camera plane) and offsetting the element in the left and right eye composites to simulate stereo parallax. This would lead to the effect that the element had placed in depth but was still, itself, flat. This was usually pretty easy to spot but some elements had a good sense of apparent depth built-in that would allow for this trick to work.

A more advanced variation of the 2D offset trick was to do a depth-based or expression-based warp on the flat element to create parallax in the element without re-rendering. One example is a shot looking at the hobo on top of the train and snow is whipping past his ears behind him.
Rather than re-render the snow in 3D, the artist took the effects elements and created an expression-based warp where the center of the elements didn’t move but, as the viewer’s eyes moved away from the center, the viewer would get a bigger horizontal offset between the left and right eyes. This would give the effect of looking inside a cone of snow. This trick combined with applying different offsets to the different snow layers created a convincing stereo effect.
8.3 Creative Issues
While, on the surface, adapting The Polar Express for stereo could be thought of as a fairly mechanical process (create two cameras and rerender) there were several creative issues that had to be addressed as part of the process.
The first and most obvious issue was that of stereo separation. The key goal there, as already mentioned, was to achieve a strong sense of depth, without going overboard and keeping the depth consistent from cut to cut. Creating a strong sense of depth didn’t turn out to be too difficult because Robert Zemeckis tended to compose his shots with a strong depth to begin with (almost every shot in the movie has a strong background and foreground separation). Zemeckis also tended to favor longer shots, which gave the viewer more time to soak in the 3D environment. The work of a director with a quick, commercial style of editing would not have lent itself as strongly to stereo adaptation.
Another creative change for the stereoscopic release involved sharpening the focus of most of the shots to allow the viewer to see more of the scene. While in the 2D film, narrowing the depth of field (blurring of objects that are not the subject of the shot) was used quite a bit, the 3D version had most of those effects removed or reduced. This would sometimes pose a challenge for the Imageworks team because, by removing the blurs in the scene, they might expose elements that were never finished in the original movie.

Some shots had to be recomposed because of the large size of the IMAX screen and for 3D. The 3D effect works best when objects do not cross the frame boundaries. As soon as an object intersects the edge of the frame it tends to flatten out as your brain becomes aware of the edge. Some elements in the movie were adjusted to ensure they didn’t cross frame or become too large on the IMAX screen to be comfortably viewed.
Another creative issue that had to be addressed was the use of highlights, reflections and transparency.
While these view-dependent phenomena do cause subtle differences in each eye in the “real world,” they could often cause uncomfortable artifacts when viewed in the (somewhat artificial) world of a 3D projection system. To solve this, the opacity of semi-transparent objects and reflections were often adjusted to give a better stereo experience.
Highlights would also sometimes be removed or reduced if they only appeared in one eye.

8.4 What’s Old Is New Again
The Polar Express: An IMAX 3D Experience opened on November 10, 2005 to sell-out shows across the country, garnered rave reviews, and quickly went on to break numerous box office records for an IMAX film. The IMAX release grossed approximately $35 million domestically on only about 60 IMAX screens, and approximately $10 million internationally on just 20 IMAX screens, bringing the per-screen gross from this one film to over $500,000.

The success of The Polar Express 3D project has been acknowledged by Hollywood and, where before people had asked why one would want to adapt a CG film for stereo, they are now asking why you wouldn’t. Helping to push the next stereoscopic revival, several top directors including Robert Zemeckis, James Cameron, George Lucas and Robert Rodriguez are working with exhibitors to upgrade theaters for digital 3D projection. All of these directors are currently working on stereoscopic projects (both live action and CG).
Biographies
Rob Bredow
Rob Bredow is a Digital Effects Supervisor at Sony Pictures Imageworks who recently completed work on The Polar Express. Rob is currently working on the upcoming animated movie Surf’s Up as the Visual Effects Supervisor. While at Sony Rob has been involved in creating many of the complex visual effects featured in Castaway and both Stuart Little films. Rob’s other credits include the feature films Megiddo, Independence Day, Godzilla and others. Rob is experienced in the field of effects animation, shading and rendering and has presented at several conferences, including various Siggraph courses.
Albert Hastings
Albert Hastings is a CG Supervisor at Sony Pictures Imageworks. Albert supervised Motion Capture Integration (the application, editing and retargeting of motion capture data) on The Polar Express. Albert came to Imageworks from PDI to work on Spiderman. His credits include Men in Black 2 and Shrek among others. He is currently working on Monster House , the next feature film featuring the use of motion capture and animation produced by Robert Zemeckis and Steven Spielberg.
David Schaub
Animation Director David Schaub joined Sony Pictures Imageworks in 1995, and has just completed work on The Polar Express , working with director Robert Zemeckis and noted visual effects supervisors Ken Ralston and Jerome Chen. He was a supervising animator on Stuart Little 2, for which he and his team received a VES Award (Visual Effects Society) for “Best Character Animation in an Animated Motion Picture.” His other film credits at Imageworks include the Academy Award nominated Stuart Little, Cast Away, Evolution, Patch Adams, Hollow Man, Godzilla and The Craft.
Daniel Kramer
Daniel Kramer is a CG Supervisor at Sony Pictures Imageworks where he completed work on The Polar Express as the Effects Animation Supervisor. Currently Daniel is a CG Supervisor on Sony’s second animated feature Surf’s Up. Daniel joined Imageworks in 2000 to work on Spiderman where he acted as Lead Effects Animator. Prior to Imageworks Daniel helped to lead a group of artists at VisionArt creating visuals for feature films and television including Godzilla , Star Trek: First Contact , Independence Day to name a few.
Rob Engle
During Rob Engle’s career at Imageworks he has worked on projects as varied as The Polar Express: An IMAX 3D Experience as Digital Effects Supervisor, the scaly snakes of Anaconda , the big lizard Godzilla , the furry mice in Stuart Little and the feathered birds in Stuart Little 2. When not working on creature features, Rob’s credits have included Contact, Charlie’s Angels 2: Full Throttle and Peter Pan. He is currently a CG Supervisor on The Chronicles of Narnia: The Lion, the Witch and the Wardrobe , which releases in December 2005. Prior to joining Imageworks, Rob attended the University of Colorado, Stanford University and worked for Hewlett-Packard Company.
Notes from the Sr VFX Supervisors
Bi-Polar Express By Ken Ralston
As I sit here in the corner of my simple padded cell…eating the occasional fly that crawls across the wall…I want to think back to how I ended up here…and when the movie The Polar Express began.
When Bob Zemeckis and Tom Hanks decided to do this charming child’s tale I was excited and enthused on being a part of it…Bob wanted to do the whole thing as a stylized art piece…Why, oh why, did I suggest MOTION CAPTURE? It was the only way to accomplish his bidding… I just didn’t know…No film was shot…only actors… ACTORS wearing skin diving suits covered in dots. HUNDREDS of GLOWING dots… dots everywhere. I still see these dots…even when my eyes are closed. Anyway, we recorded the DATA using many infra-red cameras. For weeks on end I sat there on that stage…surrounded by these cameras emitting that INFRA-RED… I know when I walked into the volume I could smell the faint aroma of burnt bacon drifting out of my ears…my brain was slowly being barbecued by those invisible rays…I know it…I know it.
After we captured the actors’ data, and their souls…we then turned them into virtual beings living inside these television set things…computers…OH wait…I see another fly on my wall…Yummmm…anyway…I then was required to sit for days…weeks…YEARS!!!! Years inside a small room…a dark , small room where I stared at thousands of teensey ELVES running around…for YEARS…A train that traveled where no normal train could go…and Santa…Santa…It was Christmas everyday of the year…on and on…and in this claustrophobic room were all these ROCKET SCIENTISTS surrounding me, all asking me questions…like…”Should the Caruncle on the second boy on the left near the door…should it have more MOISTURE…Should the Meniscus in Holly’s eyes be…WETTER…Should the DAMN EYES BE BIGGER OR SMALLER OR GREENER OR LESS CROSS-EYED OR THIS WAY OR THAT WAY!!!!!!!
After a while time just stood still…I knew all these smart people at Sony Pictures were out to get me…to make me look the fool…Anyway…after what seemed like eighty or ninety years we stopped working on the picture…A door opened and blinding light…the sun I believe…shone in and I was released from the dark room…the dark room that now felt safe and secure.
I’m now in another small dark room and, despite the ill-fitting straight jacket, am content…especially after the lobotomy…I’m now happy…Happy…so Happy…thank you stranger for listening…bye… the artist formerly known as Ken Ralston.
A Note From Vfx Supervisor Jerome Chen
Notes on The Polar Express By Dr. Jerome Chen, attending physician to Ken Ralston My remarks are from extensive interviews with Ralston regarding events beginning in early spring of 2001 through to fall of 2004.
Mr. Ralston at this point is mostly hysterical with very brief moments of lucidity. The patient claims to have vivid recollections of a horrifying experience where a group of clearly nefarious individuals developed technology to capture the facial and body movements of a number of actors. Afterwards, these individuals, using machines with improbable capabilities, somehow reapplied this captured information to virtual beings that moved like the original performers but did not resemble them in shape or form.
When asked why someone would want to do such a thing, the patient explained that it was all wrought in order to bring a children’s book to life, and to preserve the magical quality of the book’s drawings by creating moving images where artists painted with light created by thinking machines rather than ink and brush. Mr. Ralston even wnt on to say that this method of capturing movement was meant to allow a famous actor of his day to use his movements to give life to many characters in this virtual story, one of them even a child.
During these interviews, Mr. Ralston would swing radically from elation to despondency. Powerful sedatives were prescribed but to little effect.
When pressed for more details, the patient relayed astounding feats of technical and artistic wizardry by many hundreds of obsessively driven people working deep in the bowels of a vast compound called Imageworks in the ulikely place of Culver City, California.
It was at the height of the patient’s delusional ranting where his wording become mostly unintelligible, proclaiming that “…further breakthroughs in virtual camera choreography, digital cloth simulation, fx animation, and skin and hair shading helped us realize Bob Zemeckis’ vision of this enchanting Christmas classic.”
Audio recordings aided in the reconstruction of these statements since the patient’s screaming sometimes made it difficult to understand what he was saying. It is unfortunate that the procedure has not eased the patient’s suffering. I recommend the rather drastic measure of a second round of treatment using the newly experimental electrical techniques.
This patient should be kept isolated for the remainder of his life. His delusions will spread unhealthy notions in the population.
And we must find out more about this Zemeckis fellow. If he does indeed exist, he may be source of all this insanity.
Mocabulary
| Term | Definition |
|---|---|
| Arming | When the many computers of the system are being primed, but are not yet ready to fire |
| Beat | A motion that is captured |
| Beat name | The file name of each beat |
| Bump the Rig | When someone hits the rig and ruins the calibration; as in - ‘we’ve had a rig bump’ ‘someone bumped the rig’ |
| The Burka | A hooded robe that markered actors wear when they need to be in the volume, but we don’t want to capture them |
| Calibrate | Part of the process of turning on the mocap system that makes it so that the individual mocap cameras all act as a single unit; as in ‘We have calibration’ or ‘We are now calibrated’ |
| Carve the turkey | Break up the scene captured on the 30x60 or 30x30 stage into 10-foot increments for the final body/facial capture on the 10x10 stage |
| Chicken Dance | Same thing as a short Rom |
| Chicken Noodle | Indicates moving on after shooting a beat. Derived from the film term ‘checking the gate, new deal’ |
| Copy, fire | The audible call the system operator makes to confirm that the system is recording |
| The Corral | The farthest outside the volume the actors can be for us to be able to get body data |
| Dot Farmer | A person who wraps markers in reflective material. |
| Dots | Same as jewels |
| Face Rom | ROM for the face |
| Fetch ‘n’ go | An on-set verbal call the AD makes indicating that he wants to shoot another take right away |
| Fetching | When the system is transferring data to mission control. |
| Fire | Called from the stage when the system operator is supposed to activate the mocap system |
| The Flush | To power down the software and clear out the hardware buffers. |
| Flying Tpose | A suspended tee pose; used for wire harness stunts |
| Get some pie | A command given for all on-set personal to clear the volume and move to safe pie. |
| Giraffe | An eyeline pole worn by someone when they are playing a character much taller than they are. |
| Gnomes | The nomenclature used to name a beat |
| Good Markers | Yelled by a marker checker at the end of each take indicating that all markers have been checked and none are ‘doon’ |
| Hanging chad | When a marker is dangling on an actor but has not yet fallen off |
| Hard Deck | The lowest down point in the volume that facial data can be captured. |
| Iron Cross | sitting tee pose |
| Jewels | A sphere covered in retroreflective tape - a motion capture marker |
| Knee-pose | kneeling tee-pose |
| LED’s | Same as jewels |
| Long Rom | A very complete body ROM: May sometimes include a face rom |
| Looking for gnomes | When the nomenclature of the beat name has not been called in to mission control |
| Marker Checker | One of many PA’s that check that we don’t have a ‘marker doon’ |
| Marker Doon | Yelled whenever a marker/dot has fallen off of talent: as in “we’ve got a marker doon” |
| MGM Roar | Same as a face rom |
| Mission Control | The place where all the data goes to be stored from the system: AKA “K-19 - the widowmaker” |
| Mocap Friendly | When something is not reflective and can safely be brought into the volume: as in “My shoes are mocap friendly” |
| Mocap Ready | When the mocap system is ready to capture another beat |
| Occlusive | To block a marker from camera view |
| On The Fetch | Unable to capture and waiting for fetching to finish |
| Retroreflective Sensor Engineer | See dot farmer |
| The Rig | The structure cameras are mounted to |
| Rolling | When arming is complete and the system is ready to fire. |
| ROM | Range of motion performed by the actor used to set up their digital counterpart |
| Safe Pie | A triangular shaped area just outside the volume, where producers, directors and other on-set people stand during the shoot |
| Shake ‘n’ bake | The same as fetch ‘n’ go |
| Short Rom | An abbreviated body ROM: May sometimes include a face rom |
| Snorkel | Same thing as a Giraffe |
| Stage | The place where the volume is located |
| Sweet spot | The center of the volume where there is the most camera coverage |
| The System | All the cameras and computers that control them |
| Tee-Pose | Standing position taken by actors at the start and end of beats |
| Triangulators | The Art department people on-set who are responsible for figuring out where things go in the volume to relate to the 3D environment |
| Universal Master | A facial only capture that will be pasted onto a body capture that is done separately |
| The Volume | The area where the cameras are all aimed, within which face and body data may be captured |
| Zbar | Metal pipes and connectors used to create mocap props and set pieces |
| Zulus | The mocap grip team |
| Zulu platforms | Mocap platforms that can be set to different heights |
Imageworks Credit Roll
Imagery and Animation by SONY PICTURES IMAGEWORKS INC.
Associate Producer
DEBBIE DENISE
Visual Effects Supervisors
KEN RALSTON JEROME CHEN
Visual Effects Producer
CRAIG SOST
Digital Producer
CHRIS JUEN
Animation Supervisor
DAVID SCHAUB
Digital Effects Supervisors
ROB BREDOW MARK LAMBERT ALBERTO MENACHE SEAN PHILLIPS VLADIMIR TODOROV
Art Directors
MARTY KLINE GEORGE SUHAYDA
Motion Capture Supervisor
DEMIAN GORDON
Integration Supervisor
ALBERT HASTINGS
Lead Technical Advisor
CLIFF BRETT
Models & Texture Supervisor
KEVIN HUDSON
Effects Supervisor
EDWARD TAYLOR
Computer Graphics Supervisors
J.J. BLUMENKRANZ BERT VAN BRANDE JAMES WILLIAMS
Digital Production Manager
SHO IGARASHI
Character Set-Up Supervisor
DANIEL KRAMER
Character Rigging Supervisor
IVO HORVAT
Look Development Leads
KATHERINE CONCEPCION MANDY TANKENSON JULIE ZACKARY
Digital Editors
TIM EATON CHRISTOPHER POPLIN
Lead Color & Lighting TD
LISA SUZUKI
Lead Matters & Compositors
JUAN GONZALES CARLOS PEDROZA
ImageMotion Integration Leads
RONALD FISCHER COREY TURNER
ImageMotion Integration
THOMAS BLAND PAUL CECH KEVIN CUSHING DON JOHNSON NEIL LIM SANG ROBERT MACKENZIE JOHN MEEHAN DAVID BENNETT SCOTT BOGONIEWSKI PIERRE CHASTAIN CHARLES GHISLANDI ERIC LALUMIERE DANIE LUPOVICI KEVIN MAHORNEY KLEE MILLER DAVID PENG TREY STOKES SANDRA WARREN MICHAEL MUMBAUER JULIAN SARMIENTO CHRISTINA SWING DAVID WASHBURN
Character Animation
ALFONSO ALPUERTO WOLF-RUEDIGER BLOSS TOM BRUNO JR. STEPHANE COUTURE RENATO DOS ANJOS ROBERT FOX JORDAN HARRIS SETH HIPPEN JON HOOPER ALICE KAISERIAN MICHAEL KIMMEL JEFF LIN MARCO MARENGHI PATRICK OSBORNE DENIS SAMOILOV BRIAN SCHINDLER TOM SOREM ROGER VIZARD ERIC WEISS LAURA BARBERA FRANK BONNIWELL RANDY CARTWRIGHT JAMES CROSSLEY CHRISTOPHER ENDICOTT KELLY GOLDSTEIN NICOLE HERR T. DANIEL HOFSTEDT PAUL JESSEL MICHAEL KIELY KELVIN LEE LES MAJOR JAMES MOORHEAD KEITH PACIELLO HENRY SATO JR. ALEXANDER SOKOLOFF WILLIAM TESSIER DAN WAWRZASZEK CHRIS WILLIAMS
Cloth and Hair
ARTURO AGUILAR AIMEE CAMPBELL OSCAR CASTILLO CURTIS EDWARDS BARBARA ELLISON ASHRAF GHONIEM DAVID KERSEY EUN JAE LEE CHRISTO LIBARIDIAN GUSTAV MELICH SCOTT PARRISH SEAN WHITE KALIM WINATA JAY BANKS BRIAN CASPER MARK DE SOUSA JEFF EDWARDS OLIVER FINKELDE AVNEET KAUR ANDY KING MICHAEL LEVINE CHRISTOPHER LOGAN ROBERT NITSCH ERIC WARREN DUSTIN WICKE KEVIN OAKLEY
Effects Animation Leads
MATT HAUSMAN CARL HOOPER
Effects Animation
DEBORAH CARLSON DAVID R. DAVIES BRIAN DAVIS MARC HORSFIELD HAE-JEON LEE AARON JAMES McCOMAS JOHN PATTON ALLEN RUILOVA PETER SHINNERS MATTHEW CORDNER MATTHEW DAVIES ANDY GAUVREAU DAN KESSLER STEPHEN MARSHALL STEVEN ONG CHERIE RYE VINCENT SERRITELLA
Sequence Lighting Supervisors
PATRICK COHEN JEP HILL MACDUFF KNOX CARLOS VIDAL R. STIRLING DUGUID ADRIAN ILER DAVID PARRISH ROBERT WINTER
Pre-Visualization Leads
ANDREW TITCOMB HARALD KRAUT
Pre-Visualization
ANA MARIA ALVARADO PEPE VALENCIA TIMOTHY SOMAN
Wheels
ALEX HEAD BRIAN DOMAN
Environment and Prop Modeling
FRANCOIS BORDEZ JOHN BUTIU MARC STEINBERG CHRISTIAN BOUYER MARK KRENTZ DUSTIN ZACHARY
Character Modeling Lead
MARVIN KIM
Character Modeling
MARCOS KANG ERIC SANFORD YUN GEUK KANG
Matte Painting
DAVID BLEICH JOSHUA GEISLER-AMHOWITZ ALLEN GONZALES ERIC MCLEAN THOMAS ESMERALDA STEVE MATSON
Shaders
SERGI SAGAS JEFFREY DILLINGER
Texture Set-Up
NICK GRAY LUTZ MULLER
Wheels Set-Up
ANDREW CHO
Color and Lighting ATDs
ALFREDO BARCIA TODD HARA AARON LAWN JAMES PARK DARREN FISHER GINKA KOSTOVA JAMES LEE RUBEN FLORES
ImageMotion Tracking Leads
AMY TAYLOR JOSH HUTCHINS STEVEN ILOUS
ImageMotion Tracking
SARAH BACK KEVIN CARNEY NISHIRA FITZGERALD JOSHUA OCHOA MARK LIPSMEYER ANDRE PETROSSIAN ALON ZASLAVSKY DANIEL CAMP KURT DUFRESNE DARTAYOUS HUNTER ODED KASSIRER MATTHEW O’CALLAGHAN J.R. SALAZAR
Additional Character Design
DAVID COLMAN
Production Services Technicians
CHRISTOPHER CARIGNAN DANIEL GREENSTEIN JEFFREY POHL JAMES SALTER AARON WILSON GALE DE LOS SANTOS MICHAEL MAY ANDREW ROSE JORDAN SOLES NATALIA ZOUBTSOVA ERIK OBER STEVEN SHAPIRO CHIKAKO TERASHITA MATTHEW WONG COREY MACMILLAN IVO PANAYOTOV LORI SMALLWOOD JANN WIMMER
Digital Intermediate Colorist
PAUL McGHEE
Digital Intermediate Supervisor
C. MARIE DAVIS
Digital Intermediate Coordinator
KATHLEEN WOOLERY
Research and Reference Photography
CHRIS HEBERT LEAH HARDSTARK
Pipeline Producer
BRIAN KEENEY
Pipeline Engineers
ALAN DAVIDSON JOHN McLAUGHLIN RENE LIMBERGER SAM RICHARDS
Negative Coordinator
NIKKI BELL
Negative Handling
BOYD STEER
Film Recording Supervisor
DENNIS WEBB ROBERT DAVIS OH
Systems Engineering
ALBERTO VELEZ GERARDO DE LA CRUZ STEWART HOFFMAN DAVID MIYA MICHAEL TRUJILLO
Sr. Systems Engineer
ROBERT BROPHY
Software Development
BRUCE DOBRIN DAN LAKE JEAN-FRANCOIS PANISSET
Resource Management
AMIT AGRAWAL BRIAN HALL LESLIE PICARDO ANDREA SOLIS
Editorial Engineers
CHRIS BURDORF KISHORE MULCHANDANI ROBERT RAY
Artist Production Supervision
MYLENE PEPE JAMIE PILGRIM MICHELLE MURDOCCA DANIEL KUEHN BRADFORD SIMONSEN PIA TURCHYN VIRGINIA BOWMAN CATHY DEUTMEYER ROBIN LINN RACHEL PHILLIPS DANIELLE CONROY JENNIFER JUEN LAUREN ANN LITTLETON LISA SANDERS SANDE SCOREDOS DIANE ST. CLAIR
Senior Supervision
TIM SARNOFF JENNY FULLE
Special 3D Imagery by SONY PICTURES IMAGEWORKS
Visual Effects Supervisor
JIM BERNEY
Visual Effects Producer
JOHN CLINTON
Digital Effects Supervisor
ROB ENGLE
DPM
SKYE LYONS
APM
FREDERICK LISSAU
Digital Leads
JD COWLES KENJI SWEENEY LEN WHITE
Visual Effects Digital Coordinators
CHRIS MCLEOD JEREMIE WINSLOW
Digital Tool Developers
VIJOY GADDIPATI
Digital Artists
BRIAN ADAMS LESLIE BAKER TODD BOYCE MICHAEL CONDRO MARK ANDREW DE LA GARZA JAMES FLUX RAY HALEBLIAN JULIE ADRIANSON JILL BERGER THELVIN CABEZAS MARIA GIANNAKOUROS JOHN HALEY
FX Leads
THEO VANDERNOOT DAN ZIEGL
FX Animators
KEVIN GILLEN CARLO VOLPATI MORRIS MAY BJORN ZIPPRICH
Digital Artists
ERICA HORNUNG JENNIFER HUNT MICHAEL KENNEDY RAJI KODJA KENNY LAM CHRISTINE J. LO ANDREW NAWROT ALBERTO NOTI YUKOYAYA OKUMURA STEPHEN PARKER SOREN RAGSDALE GEORGE RICHMAN RICHARD SANDOVAL JOHN SASAKI B. DURANT SCHOON JASON SCHUGARDT JEFF SHANK ROB STAUFFER KA YAW TAN THERRANCE TORNBERG
Lead Production Services Technician
JEFF SAKURAI
Sr. Systems Engineer
ROBERT BROPHY
Production Services Technicians
ERIK OBER STEVEN SHAPIRO CHIKAKO TERASHITA MATTHEW WONG COREY MACMILLAN IVO PANAYOTOV LORI SMALLWOOD JANN WIMMER
Sony Pictures Imageworks, Culver City, CA, USA
Images courtesy of Warner Bros. Pictures and Sony Pictures Imageworks.
©2004 Warner Bros. Ent. All rights reserved.
©2004 Sony Pictures Imageworks Inc. All rights reserved.
Original layout and design by Noé Padilla in Quark™ 4.11 on Apple Macintosh G5
Converted to HTML via Markdown by Rob Bredow on a M1 iMac